5. Setting Up a Homegroup
Windows
7 has a new networking feature called HomeGroup that can make sharing
files, folders, printers, and music/video media very easy. What a
homegroup does is let each user decide whether or not to share specific
categories of documents, music, video, printers, and so on, or even
specific folders and files. Once shared, every user on every computer in
the homegroup can see the items, without worrying about passwords or
usernames. It’s all just there, organized, and easy to get to.
HomeGroup networking works by setting up a
password that is used to join each computer to the group. Once a
computer has been made a member of the homegroup, any user on any of the
member computers can see any of the group’s shared folders and
printers.
Is a homegroup right for you? Consider these points to decide whether or not to use this new feature:
The HomeGroup feature works only with
Windows 7 computers. Computers running Windows Vista, XP, Mac OS, Linux,
and so on can still use folders and printers shared by computers in the
homegroup if you take some additional steps. Likewise,
Windows 7 computers that aren’t members of the homegroup can still
access the folders and printers shared by the group’s member computers,
if you take those same additional steps. Within
a homegroup, you can’t decide individually which other users can see
your shared stuff and which users can’t. Anybody who can use a computer
that’s a member of the homegroup can use the content that you decide to
share. Note If you have a computer
that is part of a domain network when you connect at work, you can still
join it to your homegroup at home. You’ll be able to use folders and
printers shared by other computers in the homegroup, but you won’t be
able to share any of your computer’s folders with the group. |
What you can
control is whether to share your stuff or not, and whether the other
users can just view and use your stuff or modify, delete, and add to it.
If you don’t need to control access on a
person-by-person basis, then a homegroup is definitely a convenient
thing to set up. If a homegroup isn’t right for you, skip ahead to the
next section, “Alternatives to Using a Homegroup.” (It’s easy to change your mind later on, so don’t worry too much about this.)
To set up a homegroup, log on to one of your Windows 7 computers and perform the following steps:
1. | Click Start, Control Panel, Choose Homegroup and Sharing Options (under Network and Internet).
| 2. | Click Create a Homegroup.
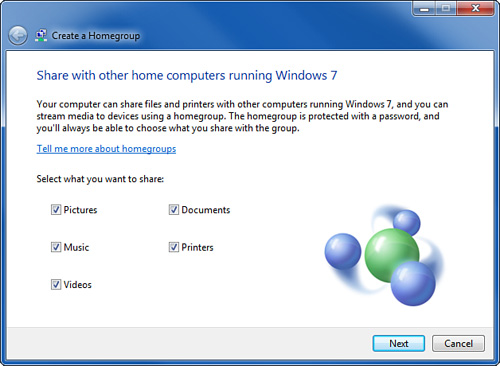
| 3. | Select which types of your content you want to share with everyone else in the homegroup, as shown in Figure 2.
Check Pictures, Documents, Music, and/or Videos to let other users see
your files. Check Printers to share your computer’s printer(s) with
other computers in the homegroup. When you’ve made your selections, click Next.
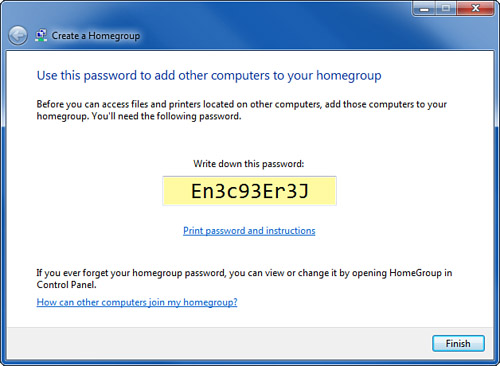
| 4. | Windows will create the homegroup settings, and will display a password as shown in Figure 3.
You might want to jot it down, as you’ll need it to join your other
Windows 7 computers to the homegroup. Upper- and lowercase matter, by
the way. Click Finish to complete the process.
| 5. | We
suggest that you use the random homegroup password that Windows
generated for you. You don’t have to worry about remembering it, because
any member computer can redisplay it for you whenever you want. But if
you really want to change it, you can, and now is the time. Click Change
the Password, and then when the pop-up box appears, confirm by clicking
Change the Password there too. Type in a new password. (Remember that
any member computer can view it, so don’t use your personal password.) Click Next, then Finish.
Now, on to your other computers:
| 6. | You
or another computer owner should go to another Windows 7 computer on
your network, log on, and click Start, Control Panel, Choose Homegroup
and Sharing Options, Join Now.
| 7. | Select the types of files that this
computer user wants to share with the rest of the homegroup. (And
remember, it’s easy to come back and change these selections later.)
Then, click Next.
| 8. | Enter
the homegroup password and click Next. (If you don’t have it written
down, go to a computer that’s already a member, and click Start, Control
Panel, Choose Homegroup and Sharing Options, View or Print the
Homegroup Password.) Finally, click Finish.
|
Repeat steps 6 through 8 on any other Windows 7 computers that you want to join to the homegroup.
Each user on each computer will have to log on
and decide which of their materials they want to share with the
homegroup. Until they do, their names won’t appear in the Homegroup
listing in Windows Explorer. 6. Alternatives to Using a Homegroup
HomeGroup security gives anyone in the group
access to any shared folder or printer. If you need to restrict access
to shared folders and printers on a user-by-user basis, or if you have
computers that don’t run Windows 7, you might not want to set up a
homegroup, but instead use the traditional Windows file sharing scheme.
There are two ways you can configure traditional sharing:
If you have OSs other than Windows 7 on
your network and you don’t need per-user security, you can turn off
Password Protected Sharing. To do this, click Start, Control Panel,
Choose Homegroup and Sharing Options (under Network and Internet),
Change Advanced Sharing Settings, Turn Off Password Protected Sharing. This makes any shared folder or printer available to anybody who can connect to your network, with no passwords required at all. If you have computers running Windows XP, Vista, Mac OS, Linux or other OSs. If
you need to control in detail which users can use which shared files
and folders, leave Password Protected Sharing turned on (which is the
same as disabling Simple File Sharing on Windows XP). You will have to
set up the same user accounts with the same passwords on each of your
computers so that people can access shared folders and printers.
7. Wrapping Up
This completes the procedure for setting up
Windows networking on one Windows 7 computer. Repeat the procedures on
your other computers, and you’ll be able to start using your network.
Before you do, though, now that you have a
LAN—even if it’s just a simple peer-to-peer LAN—you should be worried
about network security and hackers. Why? Because you’ll certainly be
connecting to the Internet, even if only intermittently, and when you
do, you risk exposing your network to the entire world. These risks are
not as far-fetched as you might think.
|